Insulating the Ceiling and Walls of an Older Attic
When insulating older attics, the work typically consists of a two-stage process, because the spacing of timber frames may vary quite significantly.
The current regulations require a U value of 0.09 in the roof and 0.17 in the walls. As the cell structure of FINNFOAM is completely consistent, detrimental air leakage cannot occur inside the panels and the warm air can rise upward. If the seams are also sealed using a flexible PU foam sealant, the entire structure will become continuous and leak-proof. This means that heat can only be transferred through conduction and radiation instead of air leakage. Radiation has a limited effect in regular room temperature. Most of the heat is therefore transferred through conduction, which is not affected by gravity and thus conduction occurs equally through the walls and the roof. This is why it is reasonable to use the same thickness of insulation in the walls and the roof.
The U value of the insulation described below would be around 0.19–0.20 depending on the density of the timber frames. In a wall, 130 mm of insulation would be enough to meet the U value of 0.25 based on the regulations, but you would need approximately 250 mm of insulation in the roof to reach the required U value of 0.16. However, you can compensate for the “insulation deficit” (-40 mm) in the roof by increasing the thickness of insulation in the walls beyond the required amount (+40 mm). The payback period of the 40 mm of “excessive” insulation in the walls is considerably shorter than it would be for adding a corresponding amount of insulation to the roof (170 mm + 40 mm = 210 mm).
A U value does not represent the whole truth of the insulation capacity of a structure. The structure’s leakage rate (n50) is almost as important. Today, the average leakage rate for timber framed houses is 4. The leakage rate can be reduced to 1 if the structure is airtight. Airtightness will provide the same reduction in the building’s energy consumption as would be achieved with approximately 25% of supplementary thermal insulation – by lowering the U value.
STAGE 1 – INSTALLING FINNFOAM BETWEEN THE ROOF TRUSSES
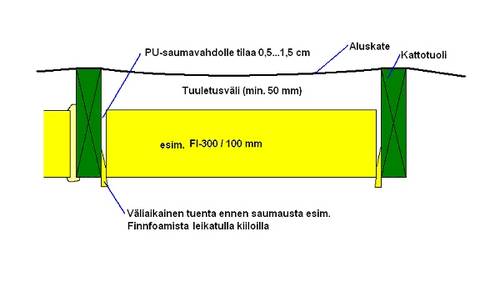
Cut a piece of FINNFOAM that is approximately 1–2 cm shorter than the space into which it is installed. Use tapered pieces of FINNFOAM, for example, to wedge the panel in between the roof trusses such that its lower surface is level with the trusses. Leave a ventilation gap of a least 50 mm in between FINNFOAM and the roof-covering. You can also install more than one layer of panels in between the roof trusses.
STAGE 2 – SEALING THE JOINTS WITH PU FOAM SEALANT
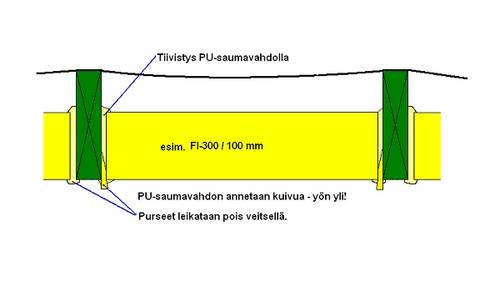
Apply a decent amount of PU foam sealant (polyurethane) in between the roof truss and FINNFOAM. We also recommend applying a small amount of foam sealant to the vertical seams between panels. Once the sealant has hardened, cut off any excess foam on the inside surface and remove the FINNFOAM wedges.
STAGE 3 – INSTALLING INSULATION BELOW THE ROOF TRUSSES

Construct a continuous layer of insulation below the roof trusses (we recommend using rabbet profile panels for tighter seams), thus minimizing thermal bridging. The FINNFOAM panels may be secured lightly to the FINNFOAM above with screws. Apply a small amount of foam sealant to each seam and lay the next panels down immediately before the foam hardens. Mark the locations of the roof trusses on the surface of the FINNFOAM panels.
STAGE 4 – SECURING THE INSULATION PERMANENTLY
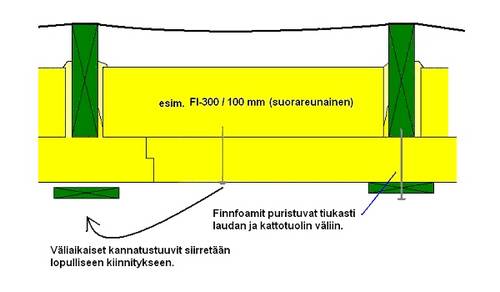
The continuous interior layer of FINNFOAM insulation is fixed permanently in place with board and long screws secured to the roof trusses. You can remove the temporary attachment screws as the work progresses and reuse them for the permanent attachment. Apply a small amount of the foam sealant to the holes left over from the temporary attachment.
STAGE 5 – INTERIOR CLADDING AND ELECTRICAL WIRING
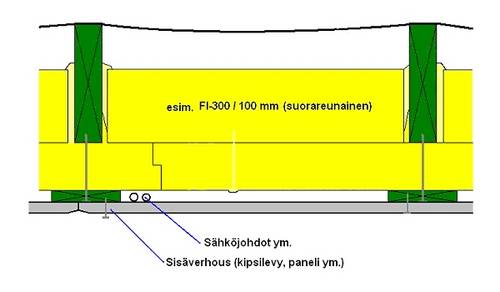
Secure the interior cladding to the boards, which could, for example, consist of wood paneling. You can also secure gypsum boards, but if the board spacing is approximately 900 mm, you should fix the boards with a tighter spacing (450 mm). Otherwise, there is a risk that the gypsum boards begin to sag in the middle. In this case you will need an additional board that may be fixed to the FINNFOAM using an adhesive and/or coarse thread screws. Even a coarse thread screw will hold fast onto FINNFOAM and easily provides more than 20 kg of pulling resistance. However, the actual support for the interior cladding is provided by the boards that are connected to the roof trusses. A small amount of clearance is left between the interior cladding and FINNFOAM, which also provides some insulation and provides an excellent space for hiding electrical wiring, etc.