ATTIC INSULATION
The utilization of a building can be maximized with effective and properly implemented thermal insulation of the attic. The roofs of storage attics are often quite low and as wasting expensive space is undesirable, the insulation used for the space should be chosen carefully to avoid unnecessary reduction of space.
The roof trusses in storage attics are in practice always reinforced, so structural work is usually unnecessary, which means that you can start with insulation. Insulating old attics is usually a two-state process, as the spacing in between timber frames may vary significantly. The selection of insulation should also consider whether the space is turned into a semi-heated room or a heated living space.
By using an insulation with the best possible performance, you can achieve the desired insulation capacity with the lowest possible insulation thickness, thus ensuring the maximization of room height and surface area.
CHOOSING YOUR INSULATION
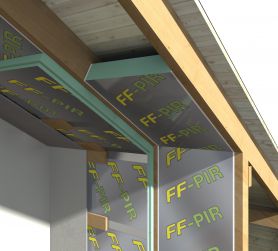
FINNFOAM (XPS) and FF-PIR insulation products can be used to utilize attic spaces, while maximizing energy efficiency and eliminating moisture and mold issues. FINNFOAM and FF-PIR insulation products are also light to handle and easy to work with. Both FINNFOAM and FF-PIR insulation products also function as a vapor barrier within the structure.
Under previous regulations, a U value of 0.15 was required for roofs and a U value of 0.24 for walls. The current minimum requirement specified by the effective regulations is 0.09 for roofs and 0.17 for walls. The older requirements have been treated as the minimum level that should always be targeted during insulation, but if there is sufficient space, it is advisable to produce the structure with a thicker layer of insulation to ensure maximum energy efficiency. The cost of energy will be rising significantly in the future and choosing a thicker insulation will only increase the cost of renovation marginally. The new Decree of the Ministry of the Environment on the Fire safety of Buildings that entered into force at the beginning of 2018 made it possible to use fireproof FF-PIR insulation products in the attics of P1 and P2 fire class buildings. FINNFOAM insulation products may only be used in P3 fire class buildings.
INSULATION THICKNESS
With the efficient FF-PIR polyurethane insulation products (declared thermal conductivity 0.022 W/mK), thin and leak-proof structures can be constructed easily. For walls, a layer of FF-PIR insulation with an approximate thickness of 130 mm is sufficient for achieving a U value of 0.17 based on current requirements, and a layer of approximately 100 mm will meet the older standard of 0.24. In a roof, a U value of 0.09 can be achieved with approximately 240 mm of FF-PIR, and a U value of 0.15 with approximately 150 mm. We recommend that U values based on the existing minimum requirements are always used when designing the insulation.
FINNFOAM insulation products can also be used to provide efficient insulation in a cost-effective manner. Approximately 210 mm of FINNFOAM is required to achieve a U value of 0.17, which is the current requirement for walls, while a 150 mm layer will achieve the previously required value of 0.24. In a roof, a U value of 0.09 can be achieved with approximately 400 mm of FINNFOAM, and a U value of 0.15 with approximately 250 mm.

However, a U value does not provide a complete picture of the insulation capacity of a structure. The structure’s leakage rate (n50) is almost as important. Today, the average leakage rate for timber framed houses is 2–4. With an air-tight structure, the leakage can easily be dropped below 0.5. Airtightness will provide the same reduction in the building’s energy consumption as would be achieved with approximately 25% of additional thermal insulation. When improving thermal insulation and airtightness, you should also pay attention to the sufficiency of ventilation in the new situation.
The fully consistent cell structure of FINNFOAM prevents harmful convection, i.e., air flow, within the panels. If the seams are also sealed by using a flexible PU foam sealant, the structure will become continuous and leak-proof. This will eliminate heat transfer through air leakage, leaving only conduction and radiation, which are minimal in regular room temperature. Most of the heat is thus transferred through conduction, which is independent of gravity and occurs equally through the walls and the ceiling. Based on this, using the same thickness of insulation in both the walls and the ceiling is reasonable.
FF-PIR INSULATION PRODUCTS IN P1 FIRE CLASS ATTIC STRUCTURES
The FF-PIR insulation products have a fire technical certificate granted by VTT, which takes into account the Decree of the Ministry of the Environment on the Fire safety of Buildings that entered into force at the beginning of 2018. The certification, which was created to facilitate planning, gathers up the relevant details regarding different structural solutions. This eliminates unnecessary speculation during projects as safe and tested solutions can always be verified with the certificate.
The fire class of the insulating core component of FF-PIR insulation is D-s2, d0. In a fire scenario, the FF-PIR insulation products will char without contributing to the fire in any way. They can even be used as a fire stop: for example, an EI30 class fire stop can be achieved with a 200 mm strip of FF-PIR insulation. The decree has also made it possible to use FF-PIR insulation products in the attic structures of P1 fire class buildings, which has quickly transformed loft apartment construction.
INSTALLATION VIDEO FOR FF-PIR INSULATION:


INSTALLATION INSTRUCTIONS FOR FINNFOAM INSULATION
STAGE 1 – INSTALLING FINNFOAM BETWEEN THE ROOF TRUSSES
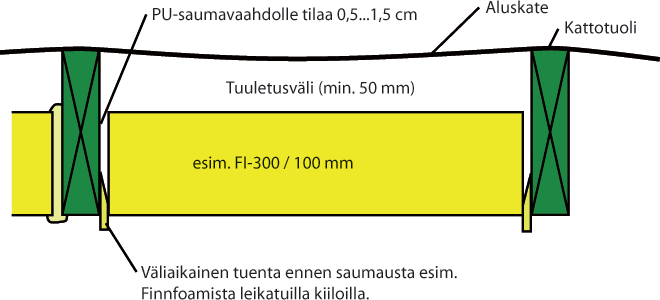
Cut a piece of FINNFOAM that is approximately 1–2 cm shorter than the space into which it is installed. Use tapered pieces of FINNFOAM, for example, to wedge the panel in between the roof trusses such that its lower surface is level with the trusses. Leave a ventilation gap of a least 50 mm in between FINNFOAM and the roof-covering. You can also place more than one layer of insulation panels in between the trusses if there is sufficient room.
STAGE 2 – SEALING THE JOINTS WITH FLEXIBLE PU FOAM SEALANT
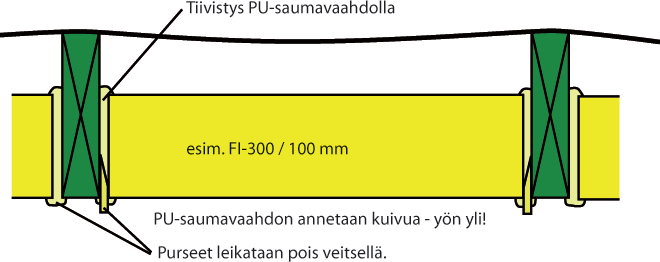
Apply a decent amount of flexible PU foam sealant (polyurethane) in between the roof truss and FINNFOAM. We also recommend applying a small amount of flexible foam sealant to the vertical seams between panels. Rub the panels against each other to remove the expanding property of the foam sealant, after which it will only function as an adhesive. Once the flexible foam sealant has hardened, cut off any excess foam on the inside surface and remove the FINNFOAM wedges.
STAGE 3 – INSTALLING INSULATION BELOW THE ROOF TRUSSES
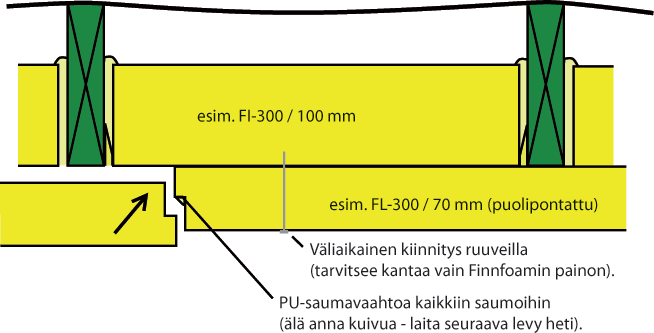
Construct a continuous layer of insulation below the roof trusses (we recommend using rabbet profile FL-200 panels for tighter seams), thus minimizing thermal bridging. The FINNFOAM panels may be secured lightly to the FINNFOAM above with screws. Apply a small amount of flexible foam sealant to each seam and lay the next panels down immediately before the foam hardens. Also remember to mark the locations of the roof trusses on the surface of the FINNFOAM panels.
STAGE 4 – SECURING THE INSULATION PERMANENTLY
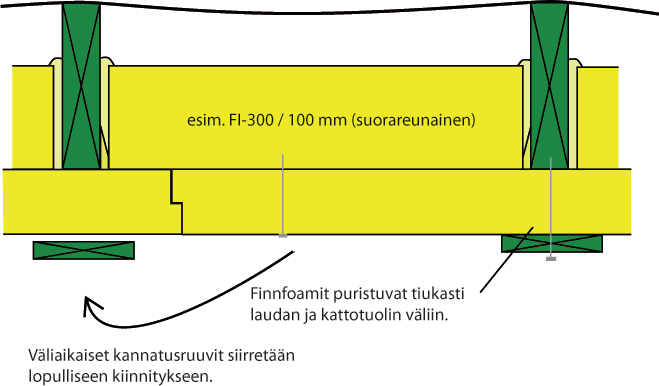
The continuous interior layer of FINNFOAM insulation is fixed permanently in place with boards and long screws secured to the roof trusses. You can remove the temporary attachment screws once the permanent attachment has been completed. You can use the temporary screws for the permanent attachment, sealing the resulting holes with a small amount of the flexible foam sealant.
STAGE 5 – INTERIOR CLADDING AND ELECTRICAL WIRING
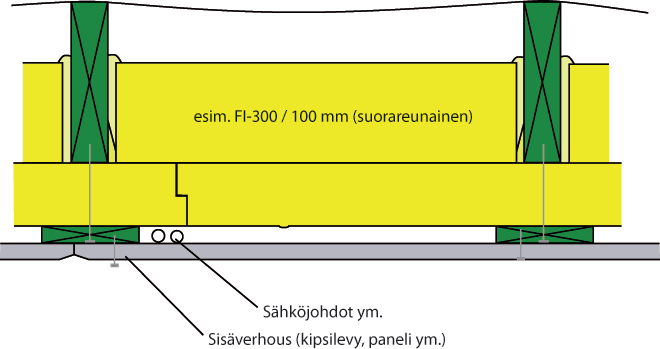
The interior cladding, such as paneling or gypsum board, is secured to the boards. If the boards are spaced approximately 900 mm apart and covered with gypsum board, the gypsum boards should be secured with a tighter spacing (such as 450 mm). Otherwise, there is a risk that the gypsum boards begin to sag in the middle. In this case you will need an additional board that may be fixed to the FINNFOAM using an adhesive and/or coarse thread screws. Even a coarse thread screw will hold fast onto FINNFOAM and easily provides more than 20 kg of pulling resistance. However, the actual support for the interior cladding is provided by the boards that are connected to the roof trusses. A small amount of clearance is left between the interior cladding and FINNFOAM, which also provides some insulation and provides an excellent space for hiding electrical wiring, etc.